VMware Workstation and Hyper-V
I recently ran into an issue with my ThinkPad while trying to run VMware Workstation 15.0 when I had the Hyper-V role installed on Windows 10 Pro 1809. Having VMware installed at the same time as having the Hyper-V role installed is not an issue, but it is not possible to run both at the same time.

By default, once the Hyper-V role is installed the ability to run another virtualization solution on top of that is no longer possible. This is due to the way that Hyper-V manages the regular Windows Kernel and the way that it allocates resources and manages the hardware once it is loaded.
Obviously, removing the Hyper-V role when not using it is possible, but it would be very inconvenient to have to constantly install/remove roles just to use another virtualization solution such as VMware. I have this same laptop setup to run VMware ESXi 6.5 on a different drive, but that requires me to effectively take the laptop offline while I run a virtual machine, and I would prefer to use that drive for another operating system (such as Linux).
An easy solution to this issue is to create a new boot entry that disables Hyper-V at startup and will allow the use of another virtualization platform (VMware, VirtualBox, etc.). This is done using the bcdedit (Boot Command Data Edit) command.
To do this, launch a Command Prompt as Administrator (PowerShell will not work). To see the existing boot entries run the bcdedit command:
C:\WINDOWS\system32>bcdedit

Windows Boot Manager
--------------------
identifier              {bootmgr}
device                  partition=\Device\HarddiskVolume5
path                    \EFI\Microsoft\Boot\bootmgfw.efi
description             Windows Boot Manager
locale                  en-US
inherit                 {globalsettings}
badmemoryaccess         Yes
isolatedcontext         Yes
default                 {current}
resumeobject            {ada423f5-c6a2-11e8-ddea-34e12df125a5}
displayorder            {current}
toolsdisplayorder       {memdiag}
timeout                 0

Windows Boot Loader
-------------------
identifier              {current}
device                  partition=C:
path                    \WINDOWS\system32\winload.efi
description             Windows 10
locale                  en-US
inherit                 {bootloadersettings}
recoverysequence        {433e1f12-c6a3-11e8-bd65-ddac20a2be71}
displaymessageoverride  Recovery
recoveryenabled         Yes
badmemoryaccess         Yes
isolatedcontext         Yes
allowedinmemorysettings 0x15000075
osdevice                partition=C:
systemroot              \WINDOWS
resumeobject            {ada423f5-c6a2-11e8-ddea-34e12df125a5}
nx                      OptIn
bootmenupolicy          Standard
hypervisorlaunchtype    Auto
There is one command that needs to be run to duplicate the existing Windows 10 boot entry:
bcdedit /copy {current} /d "Windows 10 No Hyper-V"
The output of this command will look something like this:
The entry was successfully copied to {533a4d12-c6a3-11e8-bd65-ddac20a2be71}.
Take the identifier from the command that was executed (don’t use the one from above, it won’t work for you) and use it in the next command that will disable Hyper-V in that boot entry:
bcdedit /set {533a4d12-c6a3-11e8-bd65-ddac20a2be71} hypervisorlaunchtype off
Once the commands have been entered, the new boot entry should now show up in the list of boot entries:
C:\WINDOWS\system32>bcdedit

Windows Boot Manager
--------------------
identifier              {bootmgr}
device                  partition=\Device\HarddiskVolume5
path                    \EFI\Microsoft\Boot\bootmgfw.efi
description             Windows Boot Manager
locale                  en-US
inherit                 {globalsettings}
badmemoryaccess         Yes
isolatedcontext         Yes
default                 {current}
resumeobject            {ada423f5-c6a2-11e8-ddea-34e12df125a5}
displayorder            {current}
                        {533a4d12-c6a3-11e8-bd65-ddac20a2be71}
toolsdisplayorder       {memdiag}
timeout                 0

Windows Boot Loader
-------------------
identifier              {current}
device                  partition=C:
path                    \WINDOWS\system32\winload.efi
description             Windows 10
locale                  en-US
inherit                 {bootloadersettings}
recoverysequence        {433e1f14-c6a3-11e8-bd65-bbac98a2da91}
displaymessageoverride  Recovery
recoveryenabled         Yes
badmemoryaccess         Yes
isolatedcontext         Yes
allowedinmemorysettings 0x15000075
osdevice                partition=C:
systemroot              \WINDOWS
resumeobject            {ada423f5-c6a2-11e8-ddea-34e12df125a5}
nx                      OptIn
bootmenupolicy          Standard
hypervisorlaunchtype    Auto

Windows Boot Loader
-------------------
identifier              {533a4d12-c6a3-11e8-bd65-ddac20a2be71}
device                  partition=C:
path                    \WINDOWS\system32\winload.efi
description             Windows 10 No Hyper-V
locale                  en-US
inherit                 {bootloadersettings}
recoverysequence        {433e1f14-c6a3-11e8-bd65-ccac20a2be71}
displaymessageoverride  Recovery
recoveryenabled         Yes
badmemoryaccess         Yes
isolatedcontext         Yes
allowedinmemorysettings 0x15000075
osdevice                partition=C:
systemroot              \WINDOWS
resumeobject            {add423f5-c6b2-33e8-dbea-34e12ab125a5}
nx                      OptIn
bootmenupolicy          Standard
hypervisorlaunchtype    Auto
For the Windows 10 with no Hyper-V enabled, the hypervisorlaunchtype value is set to Off which is exactly what was needed.
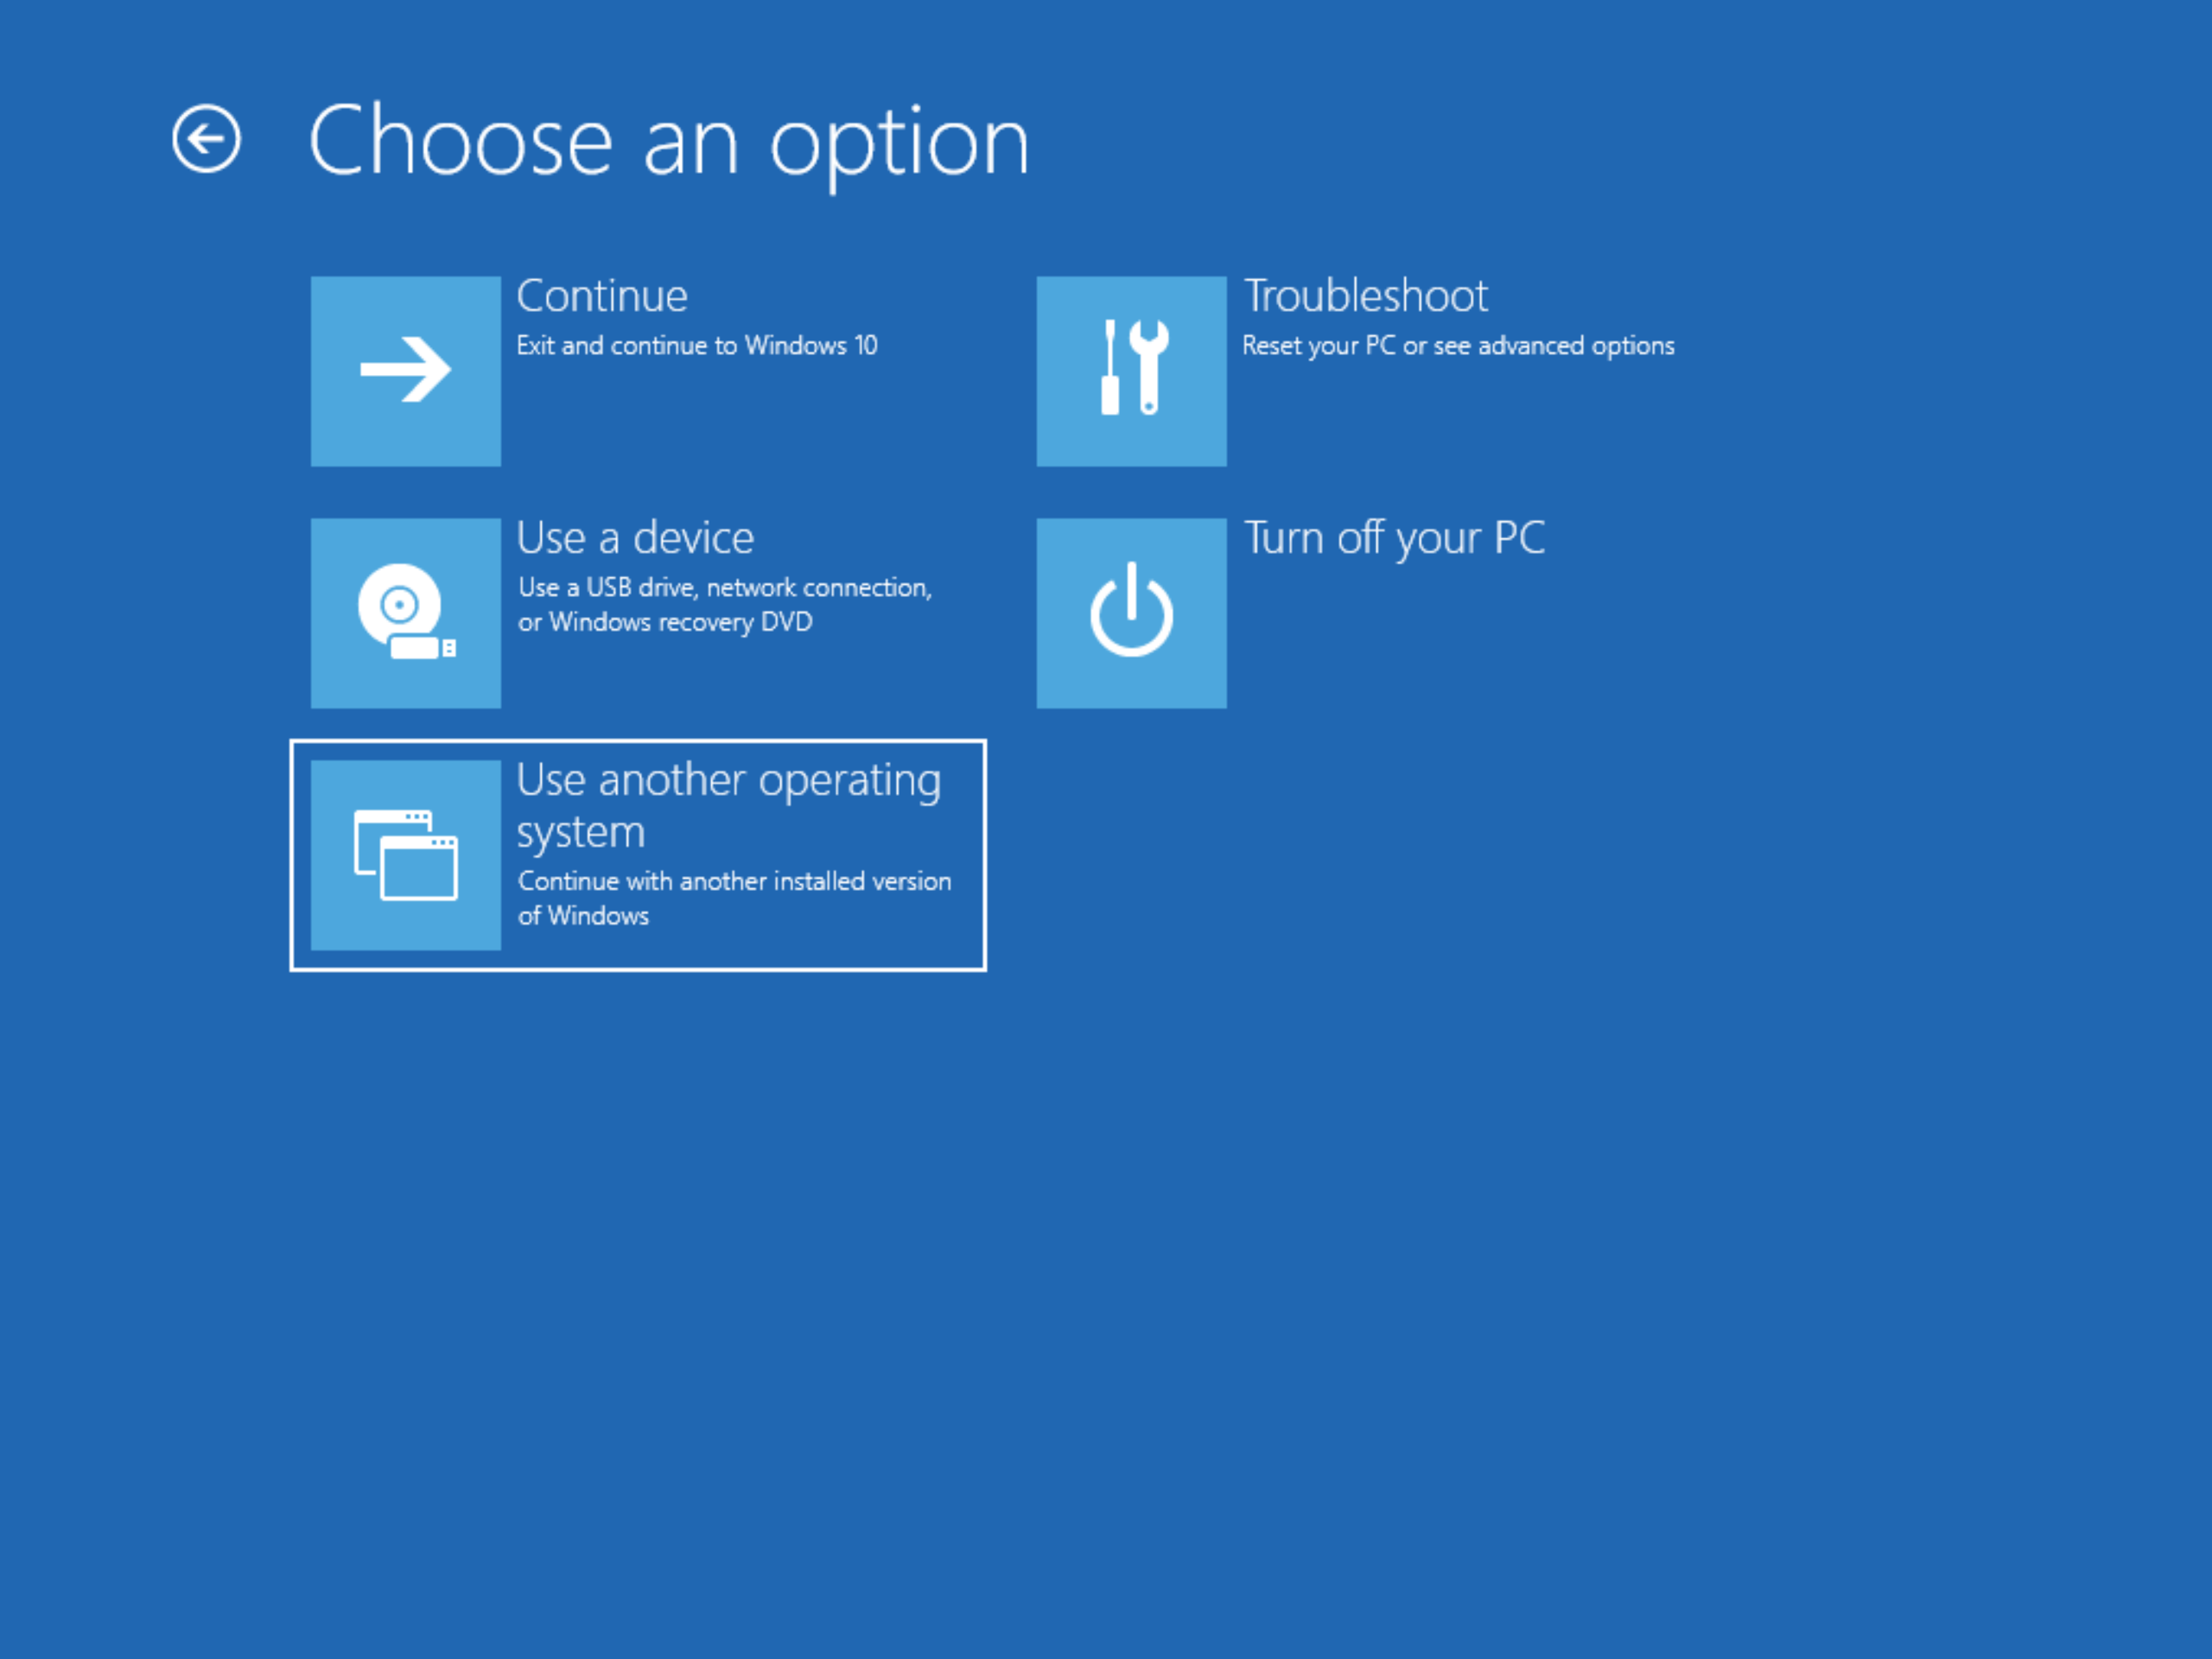
There are two ways to boot Windows 10 to this new option:
- Hold Shift and select Restart from the Start Menu. Hold the Shift key until the system restarts.
- Go to Settings, Update & Security, Recovery. Under Advanced Startup, click Restart now.
From the option screen, choose the Use another operating system option:
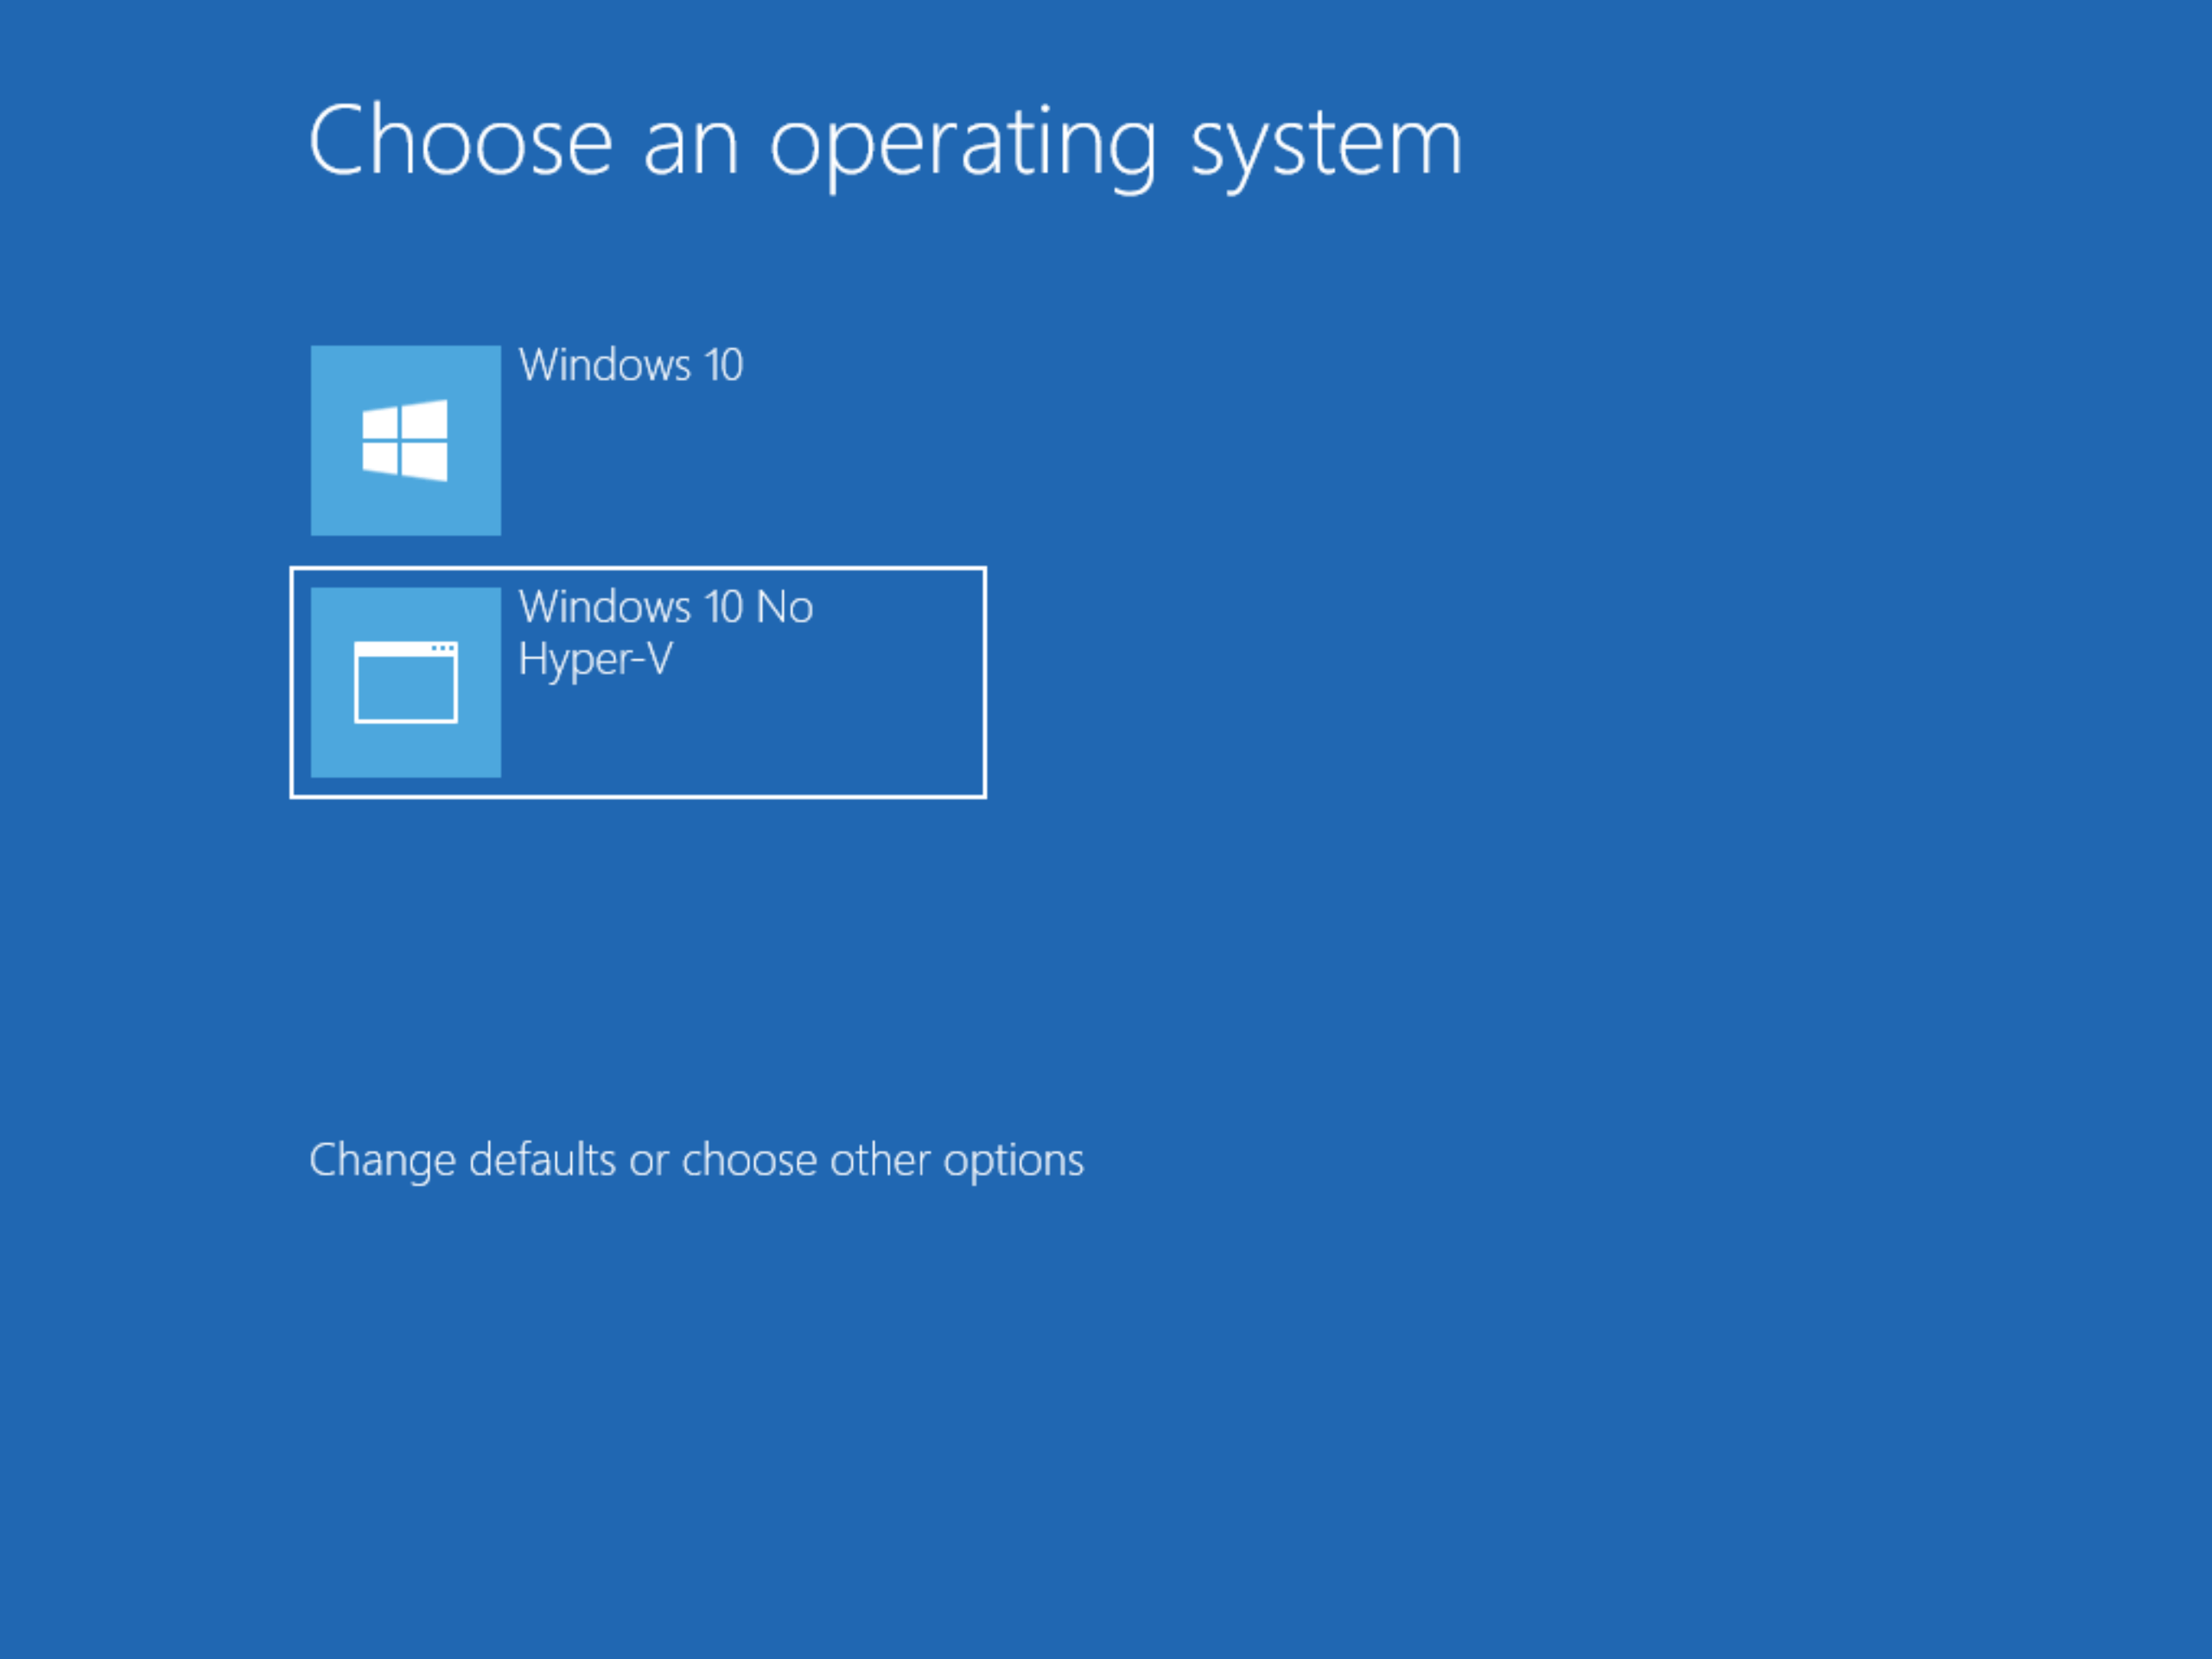
The option to boot without Hyper-V should appear as an option:
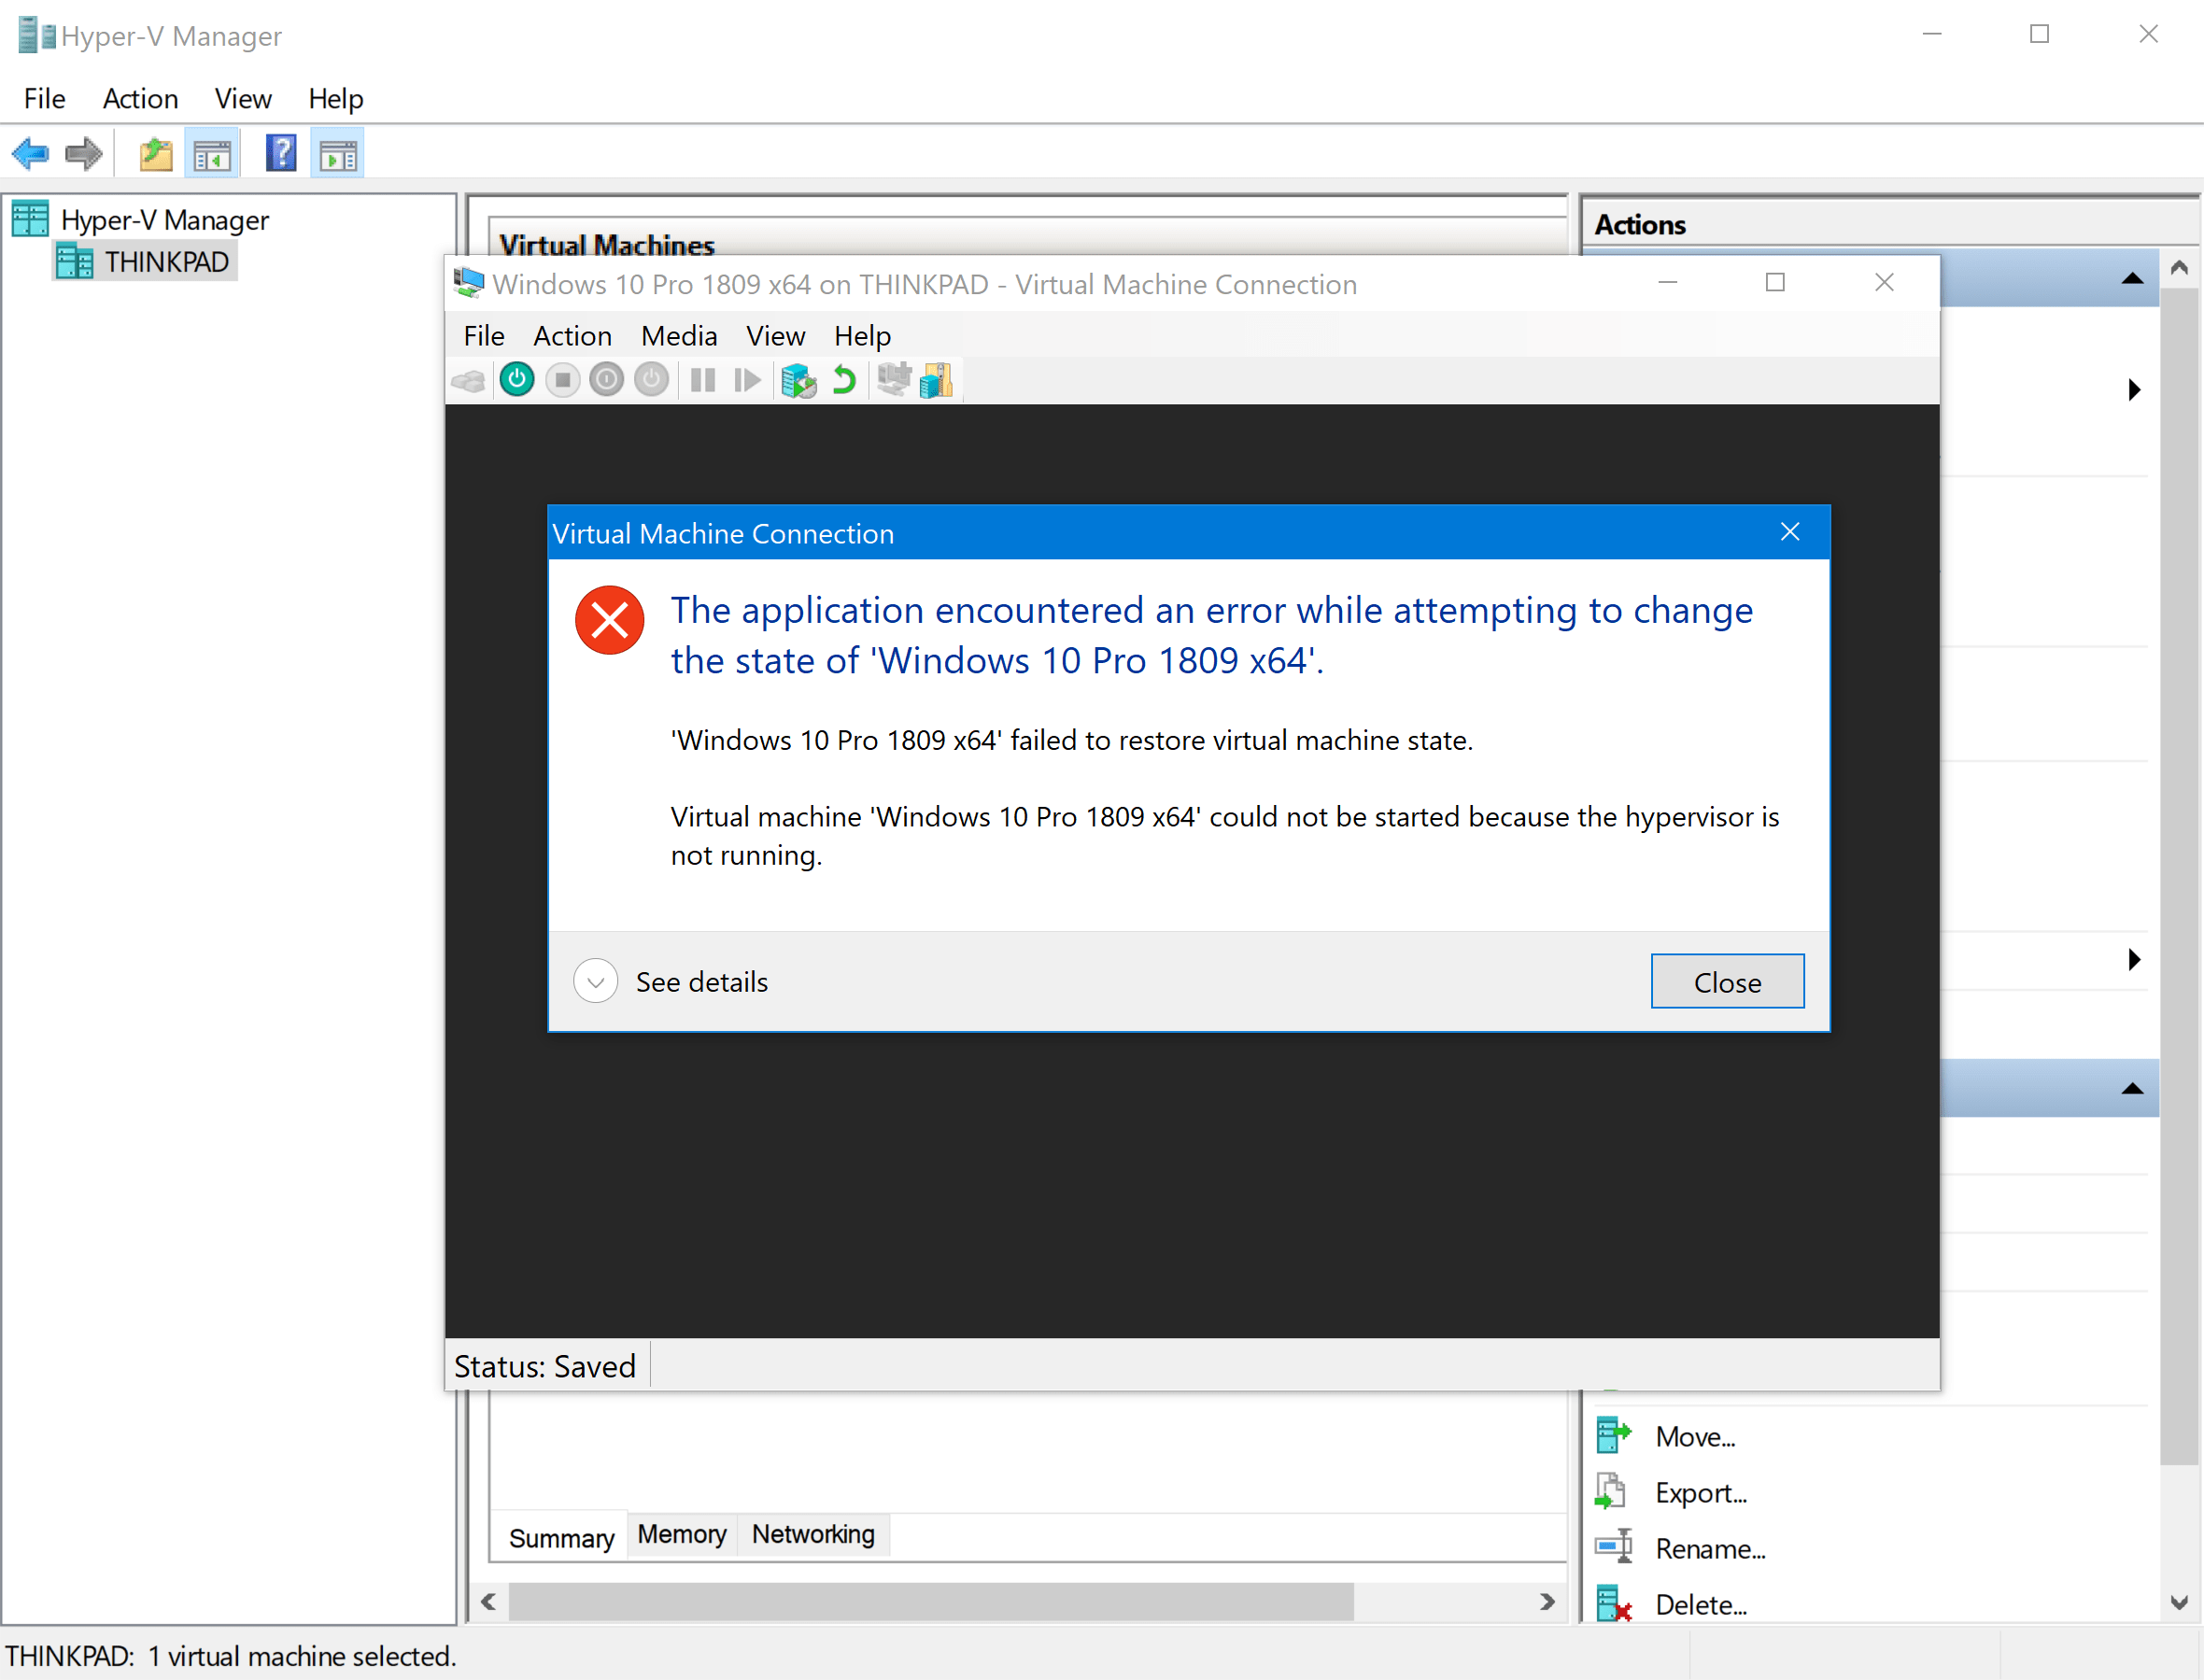
If everything worked correctly then VMware Workstation should work correctly. Hyper-V should not work, and show an error like this:
To use Hyper-V again all that needs to be done is reboot the system. While it is inconvenient to need to reboot a system to use a different virtualization solution, it is not entirely common to have to run multiple virtualization solutions on a single system, so this is certainly better than nothing.
For more information, take a look at the Microsoft Documentation for the bcdedit command.